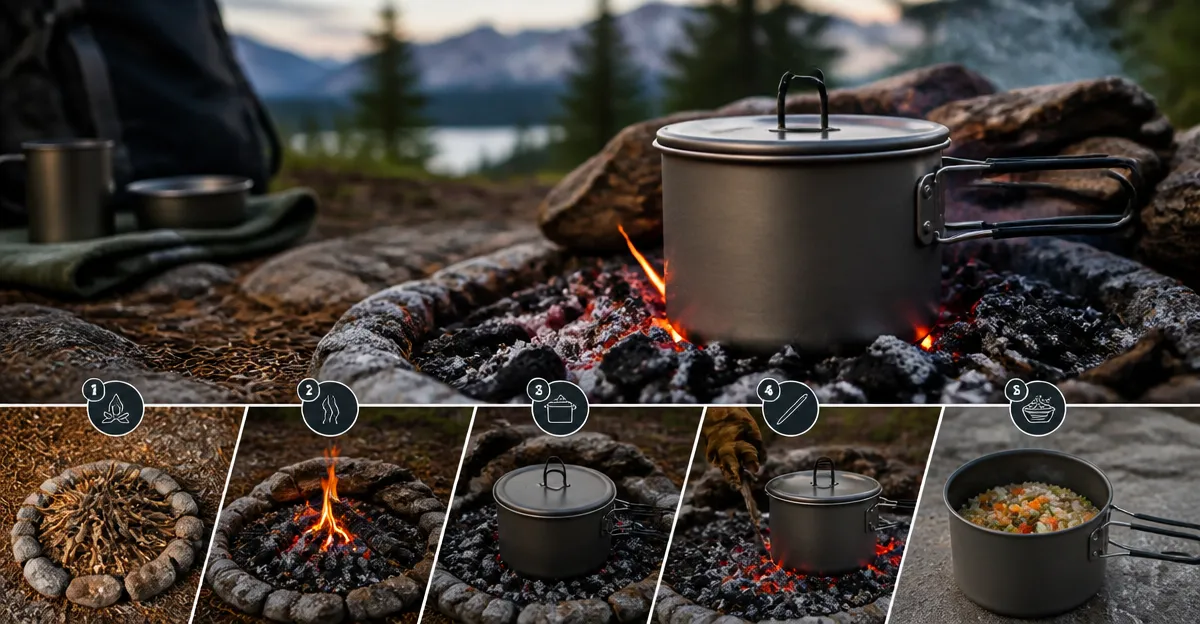
How to Ember‑Cook with a Titanium Pot: Step‑by‑Step Campfire Cooking & Safety Guide
Introduction
In this guide one will discover how to prepare nutritious meals over glowing embers using a lightweight titanium pot. The process combines traditional fire‑craft with modern ultralight cookware, allowing hikers to minimize pack weight while maintaining reliable cooking performance. Readers will learn how to select the appropriate pot, build a safe ember bed, control heat, and clean the equipment after use. Mastering these techniques provides greater flexibility on multi‑day treks and enhances overall outdoor safety.
What You'll Need
- A titanium cooking pot such as the TOAKS Titanium Pot
- Fire‑starter (matches, lighter, or ferro rod)
- Kindling and seasoned firewood
- Stove fuel canister (optional for rapid boil)
- Reusable utensils (spoon, fork)
- Cleaning brush or sponge
Step 1: Choose the Right Pot
Selecting a pot that balances weight, durability, and capacity is essential for ember cooking. The TOAKS Titanium Pot weighs only 86 g, offers a 750 ml usable capacity, and includes internal measurement marks for precise water volume. Its pure titanium construction resists corrosion, warping, and punctures, ensuring years of dependable use. The foldable handles and fitted lid simplify handling over hot embers, while the mesh storage sack protects the pot during transport. At a price of $26.00 and a rating of 4.9 / 5.0 from 3,188 reviews, it provides excellent value for solo hikers seeking ultralight performance.
Alternative options such as the MSR Stowaway Pot or the Fire‑Maple Petrel Pot may be considered when larger capacity or stainless‑steel durability is required. However, titanium remains the optimal material for minimizing heat loss and pack weight.
Step 2: Prepare the Ember Bed
Begin by building a small fire using kindling and seasoned wood. Allow the flames to burn for approximately five minutes, then let the fire die down until a bed of glowing embers remains. The ember bed provides steady, indirect heat that reduces the risk of scorching the pot’s thin walls. Spread the embers evenly in a shallow pit, leaving a gap of about two inches between the pot and the hottest coals. This spacing creates a gentle convection current that mimics a low‑intensity stove.
If rapid boil is required, a compact fuel canister can be placed beneath the pot while the ember bed supplies residual heat. The titanium pot conducts heat quickly, so a brief burst of flame will bring water to a rolling boil within three to four minutes.
Step 3: Measure and Add Water
Use the internal gradation marks on the TOAKS Titanium Pot to measure the exact amount of water needed for the recipe. For a single serving of dehydrated meals, 500 ml of water is typically sufficient. Fill the pot to the appropriate line, then place the lid on securely. The fitted lid traps steam, which accelerates heating and reduces fuel consumption.
When cooking for two people, the MSR Stowaway Pot offers a 1.6 L capacity at a price of $23.95 and a rating of 4.7 / 5.0. Its stainless‑steel construction distributes heat evenly, making it suitable for larger batches of soup or stew.
Step 4: Add Ingredients and Control Heat
Once the water reaches a gentle boil, add the dehydrated meal, pasta, or rice. Stir with a lightweight utensil to prevent clumping. Because titanium heats rapidly, the cooking time will be shorter than with heavier metals. If the water begins to boil too vigorously, lift the pot slightly to reduce direct contact with the hottest embers. This technique mirrors the “bump” method used by experienced camp cooks to avoid over‑cooking.
The Fire‑Maple Petrel Pot features a heat‑exchanger bottom that maximizes fuel efficiency. Although it is made from hard‑anodized aluminum, its 600 ml capacity and foldable handle make it an excellent backup for quick side dishes such as oatmeal or coffee. Priced at $25.59 with a 4.6 / 5.0 rating, it offers a balance of efficiency and affordability.
Step 5: Monitor Cooking Progress
Observe the pot through the lid’s vent hole to gauge steam release. The vent allows excess pressure to escape, preventing the lid from popping off unexpectedly. Use a timer or mental count to track cooking intervals; most dehydrated meals require three to five minutes of simmering after the initial boil.
For recipes that demand a gentle simmer, relocate the pot to a cooler section of the ember bed. The titanium walls retain heat for several minutes, enabling the meal to finish cooking without additional fuel.
Step 6: Safely Extinguish the Fire and Clean the Pot
When cooking is complete, remove the pot using the insulated handles and set it on a heat‑resistant surface such as a flat rock. Allow the pot to cool for a few minutes before opening the lid to avoid steam burns. To extinguish the remaining embers, sprinkle a thin layer of sand or cover them with ash, then stir gently to ensure all flames are out.
Cleaning the titanium pot is straightforward. Rinse with cold water, then use a soft brush to remove food particles. Titanium does not retain flavors, so a quick rinse is sufficient for most meals. For stubborn residue, a mild dish soap can be applied, followed by a thorough rinse to prevent soap taste.
Tips & Pro Tips
- Always test the pot’s handles for heat before handling; titanium handles may become warm during prolonged cooking.
- Carry a small metal scraper to remove stuck food without scratching the interior surface.
- When using a fuel canister, attach a windscreen to protect the flame from gusts and improve fuel efficiency.
- Consider nesting a lightweight cup, such as the TOAKS 450 ml cup, inside the pot for additional water storage.
- Mark the inside of the pot with a permanent marker to indicate personal water ratios for quick reference.
Troubleshooting
| Problem | Possible Cause | Solution |
|---|---|---|
| Water does not boil | Embers are too cool or pot is placed on a cold spot | Re‑arrange embers to create a hotter core and ensure the pot sits directly on glowing coals. |
| Pot handle becomes excessively hot | Extended contact with high heat | Lift the pot periodically or use a heat‑resistant glove to protect the hands. |
| Food sticks to the interior | Insufficient cleaning or high‑acid ingredients | Rinse immediately after cooking and use a soft brush; avoid cooking highly acidic foods for long periods in titanium. |
Conclusion
By following the steps outlined in this guide one can confidently prepare meals over embers using a titanium pot. The combination of lightweight design, rapid heat transfer, and durable construction makes the TOAKS Titanium Pot an ideal tool for solo adventurers and small groups alike. Mastery of ember cooking enhances self‑reliance, reduces reliance on heavy stoves, and deepens the connection to traditional campfire techniques.
Apply the safety practices, heat‑control methods, and cleaning routines discussed herein to ensure every outing is both enjoyable and responsible. With the right equipment and knowledge, the wilderness kitchen becomes a reliable extension of one's backpack.
Products Mentioned in This Guide
Frequently Asked Questions
What type of pot is best for ember cooking?
A lightweight, durable titanium pot with a tight‑fitting lid, such as a 1‑liter TOAKS model, is ideal for ember cooking.
How do I build a safe ember bed for a titanium pot?
Create a shallow pit, add kindling, light a fire, let it burn down to glowing embers, and spread them evenly to form a stable, low‑heat bed.
Can I use a fuel canister with ember cooking?
Yes, a small stove canister can be placed under the pot to boost heat for rapid boils when embers are insufficient.
How do I control heat when cooking over embers?
Adjust the pot’s height, add or remove embers, and rearrange them to raise or lower temperature as needed.
What’s the best way to clean a titanium pot after ember cooking?
While still warm, scrub the interior with a soft brush and mild soap, then rinse and dry to prevent corrosion.